FAQs on ASTRON for Cal. 8X82
- Is the watch sufficiently recharged?
- GPS signal reception consumes a lot of energy. Remember to recharge the watch by exposing it to light so that the indicator hand points to "full" or in between "full" and "low".
- Is the watch receiving the GPS signals?
- Please check whether the reception result of the last GPS signal reception was successful or not.
How to use
- Where can I receive the GPS signals? Where can I not?
- Does ASTRON adjust time automatically? (Does it receive GPS signal automatically?)
- How do I adjust time manually? (How do I receive GPS signals manually?)
- How do I adjust to local time after crossing into a different a time zone?
- What should I do when boarding a plane with ASTRON?
- How do I turn ON/ OFF Daylight Saving Time?
- What should I do when an indicator hand is pointing at "low"?
- What should I do when a small second hand is moving in two-second/ five-second intervals?
- What should I do when I get lost in middle of an operation?
- How do I adjust the preliminary position of the stopwatch hand, date, indicator hand, and hour/minute hands?
- How do I know the motion of stopwatch hands?
- What can I do with the crown?
- What should I do when I want to use the watch without the light detection?
- Other Questions
Troubleshooting
- How do I check whether the last GPS signal reception was successful or not?
- How do I check whether the leap second data reception was successful or not?
- What should I do when the watch does not display the correct time?
- What should I do when the watch does not adjust the time zone setting?
- What should I do when the watch is unable to display the precise time or date even though the result of the last GPS signal reception was successful?
- What is happening when the indicator hand is pointing to "0"(zero) ?
- What should I do when the indicator hand is misaligned?
- What should I do when the hands are not moving even after recharging?
- Other Questions
How to use
Where can I receive the GPS signals? Where can I not?
GPS signals can be easily received under the open sky with good visibility. The less exposure to the sky, the more difficult it is to receive GPS signals. In addition, reception will also be difficult in places where there are objects or buildings that obstruct the GPS signals, particularly during "time zone adjustment". Furthermore, alignment of satellites, weather conditions or the sun's turbulence can affect reception condition temporarily. Examples of places and conditions as are follows:
- Easy to get reception:
-
- - Outdoors under an open sky with good visibility
- Difficult to get reception:
-
- - Between tall buildings
- - Near wooded areas
- - At Stations / Airports
- - Indoors with windows
- No reception:
-
- - Indoors without windows
- - Underground
- - While passing through tunnels
- - Through special glass with thermal emission shield effect, etc.
- - Close to equipment that is generating noise or performing wireless communications
Does ASTRON adjust time automatically? (Does it receive GPS signal automatically?)
Yes, ASTRON is equipped with "automatic time adjustment" function. The watch will automatically receive GPS signals and set itself to the precise current time of the currently set time zone at most once a day. The automatic time adjustment is performed when the watch is exposed to bright light outdoors under an open sky where the reception of GPS signals is good. For this time adjustment to take place however, it is essential for the watch to have sufficient charge.
Please note that the automatic time adjustment will not be performed when the watch is in "in-flight mode" or when the watch is not sufficiently charged, also, when the watch is concealed under a sleeve and the dial is not exposed to sufficient light, even outdoors under an open sky. In this case, the watch records the time of the previous successful manual time adjustment (or time zone adjustment), and automatically starts time adjustment at the recorded time.
When the stopwatch is moving, the automatic time adjustment is not performed.
How do I adjust time manually? (How do I receive GPS signals manually?)
When the watch is in an environment where it is unable to receive GPS signals for an extended period, you can adjust to the precise current time by receiving the signal manually. By performing a manual time adjustment, the watch will display the precise time of the currently set time zone. Please note that successfully receiving the GPS signal depends on the reception environment.
- How to perform manual time adjustment:
-
- 1. Make sure you are in a place where it is easy to get GPS signal reception.
- 2. Press Button B (at 10 o'clock position) for 3 seconds, and then release it when the small second hand moves to the 0-second position.
- 3. Hold and keep the watch still with the face upward and wait for a while (up to one minute) to complete GPS reception.
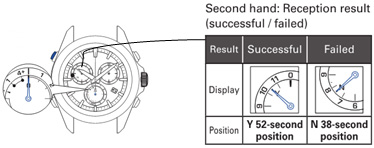
- 4. The reception is completed successfully when the small second hand points to "Y" (at 52-second position).
- 5. If the small second hand points to "N" (at 38-second position), please try again outdoors under an open sky.
How do I adjust to local time after crossing into a different a time zone?
The watch can identify the time zone of its present location and adjust to local time by manually receiving the GPS signals. This adjustment can be made by performing a button operation.
- How to perform time zone adjustment:
-
- 1. Make sure you are in a place where it is easy to get GPS signal reception.
- 2. Press Button B (at 10 o'clock position) for 6 seconds, and then release it when the small second hand moves to the 30-second position.
- 3. Hold the watch with the face upward and wait for a while (up to two minutes) for the watch to complete GPS reception. During reception, the small second hand moves and stops at several positions.
- 4. The reception is completed successfully when the small second hand points to "Y" (at 52-second position).
- 5. If the small second hand points to "N" (at 38-second position), please try again outdoors under an open sky.
In locations where GPS signals cannot be received, the time zone can be changed manually by button operation. Please refer to pg. 21 "Manual time zone setting" in the instruction manual for the details of the procedure.
8X82 GPS SOLAR WATCH (Chronograph) Complete User Guide
What should I do when boarding a plane with ASTRON?
In order to avoid any interference with the operation of electronic devices in an airplane, please set the watch to the in-flight mode when boarding a plane. In the in-flight mode, the GPS signal reception function (time zone adjustment, manual time adjustment, and automatic time adjustment) does not work.
- How to set ASTRON to the in-flight mode:
-
- 1. Press Button A (at 8 o'clock position) for 3 seconds, and the indicator hand points to the"airplane mark."
- 2. The watch is now set to the In-flight mode.
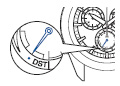
How do I turn ON/ OFF Daylight Saving Time?
Daylight Saving Time (DST) is individually set by the users depending on the area of residence. DST means "summer time," which is a system to lengthen daylight hours by advancing 1 hour when days are longer in summer. Currently, DST has been adopted in Europe and North America, and the adoption and duration vary depending on the country.
- How to turn ON Daylight Saving Time:
-
- 1. Pull out the crown to the first click. The indicator hand moves to indicate the current DST setting ("ON" or "OFF"). The stopwatch 1/5 second hand moves to indicate the current time zone.
- 2. Press Button B (at 10 o'clock position) for 3 seconds within 5 seconds after step 1.
- 3. The indicator hand moves and points to "DST(ON)," and the hour and minute hands advance by one hour.
- 4. Push the crown back in, and the indicator hand returns to display the charging status. The stopwatch 1/5 second hand returns to the 12 o'clock position.
- How to turn OFF Daylight Saving Time:
-
- 1. Pull out the crown to the first click. The indicator hand moves to indicate the current DST setting ("ON" or "OFF"). The stopwatch 1/5 second hand moves to indicate the current time zone.
- 2. Press Button B (at 10 o'clock position) for 3 seconds within 5 seconds after step 1.
- 3. The indicator hand moves and point to "・" (OFF), and the hour and minute hands turn back by one hour.
- 4. Push the crown back in, and the indicator hand returns to display the charging status. The stopwatch 1/5 second hand returns to the 12 o'clock position.
What should I do when an indicator hand is pointing at "low"?
This indicates that the charging status of the watch is low. When the charging status is displayed as “low”, the watch is unable to receive the GPS signals even when the user performs manual GPS signal reception. Since GPS signal reception consumes a lot of energy, please remember to charge the watch on a regular basis. To ensure optimal performance of the watch, it is advisable to have the indicator hand pointed to “full” or in between "full" and "low" at all times.
How to prevent a solar watch from running out of energy
What should I do when a small second hand is moving in two-second/ five-second intervals?
This is a sign that the charging status of the watch is very low. The watch is unable to receive the GPS signals, and does not have sufficient energy to operate. Please recharge the watch until the small second hand starts moving at 1-second intervals and the indicator hand points to "full" or in between "full" and "low."
If the small second hand starts moving at 2 or 5-second intervals even when the user wears the watch everyday, the watch may not be receiving sufficient light. For instance, the watch may be concealed under a long sleeve shirt and is not adequately exposed to light. In this case, try to place the watch in an environment where it will be exposed to light when not being worn.
How to prevent a solar watch from running out of energy
What should I do when I get lost in middle of an operation?
- When the crown is pushed in:
-
- 1. Press Button A (at 8 o'clock position) and release it to return to the standard time display.
- 2. The small second hand will start moving normally within 2 minutes.
- 3. Start the operation again from the beginning.
- When the crown is pulled out:
-
- 1. Push the crown back in, and wait for the small second hand to start moving. It will start moving within 6 minutes.
- 2. Start the operation again from the beginning.
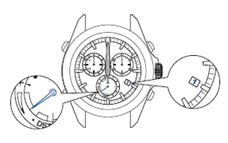
How do I adjust the preliminary position of the stopwatch hand, date, indicator hand, and hour/minute hands?
When the watch is unable to display the precise time or date, or the stopwatch hands or indicator hand do not point to the correct position even when it has successfully received GPS signals, the preliminary position may be misaligned.
- Preliminary position of this watch:
-
- The preliminary position of the date is "1"(1st).
- The preliminary position of the indicator hand is "low".
- The preliminary position of the hour/minute hands is "12:00am."
- The preliminary position of the stopwatch 1/5-second hand is "0 second."
- The preliminary position of the stopwatch minute hand is "0 minute."
-
- 1. Pull out the crown to the second click and the small second hand stops.
- 2. Press and hold Button C(at 2 o'clock position) for 3 seconds. The watch enters the mode to adjust the preliminary position of the stopwatch 1/5 second hand. The stopwach 1/5-second hand makes one complete turn and stops.
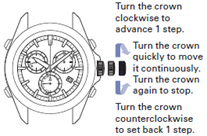
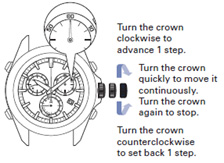
- 3. Turn the crown to set the stopwatch 1/5-second hand pointing to the "0-second" position.
- 4. Press Button C (at 2 o'clock position) and then release it. The watch enters the mode to adjust the preliminary position of the stopwatch minute hand. The stopwatch minute hand makes one complete turns and stops.
- 5. Turn the crown to set the stopwatch minute hand pointing to the "0-minute" position.
- 6. Press and hold Button B (at 10 o c´lock position) for 3 seconds. The watch enters to the mode to adjust the preliminary position of the date. The small second hand stops at the 18-second position.
- 7. Rotate the crown to set the date to "1".
- 8. Press Button B (at 10 o'clock position) and then release it. The watch enters the mode to adjust the preliminary position of the indicator hand. The small second hand stops at the 38-second position.
- 9. Rotate the crown to adjust the indicator hand as shown in the figure.
- 10. Press Button B (at 10 o'clock position) and then release it. The small second hand stops at the 0-second position.
- 11. Press and hold Button A (at 8 o'clock position) for 3 seconds. The hour/minute hands move, and stop at "12:00 am"
- 12. Push the crown back in. The watch exits the mode to adjust the preliminary position, and the small second hand and the hour/minute hands start moving.
- 13. Be sure to set the time by receiving GPS signals.
How do I know the motion of stopwatch hands?
The time measured is indicated by the three stopwatch hands; Stopwatch 1/5 second hand, Stopwatch minute hand, Stopwatch hour hand.
In increments of 1/5 of a second, the time can be measured and read for up to 5 hours 59 minutes 59.8 seconds. After 6 hours, it will stop measurement and reset. The Stopwatch hour hand returns to the display of charging status after reset.
When the measurement reaches 10 minutes, the Stopwatch 1/5 hand stops at the 0-second position in order to save charging power, but even after the Stopwatch 1/5 hand stops, the stopwatch function still runs and it can be mearured and read for up to 5 hours 59 minutes 59 second 8. When the buttons are operated to stop the stopwatch or to measure a split time, the Stopwatch 1/5 second hand displays the measured second.
Please note that the long arrow is "Stopwatch 1/5 second hand" and it does not display the current second. The Stopwatch 1/5 second hand points to the preliminary position (0-second position) when Stopwatch function does not run or the measurement reaches around 10 minutes. When you want to know the current second, please see "Small second hand" at 9 o'clock position.
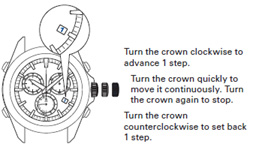
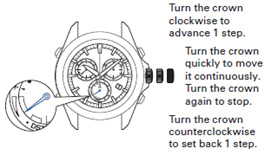
What can I do with the crown?
The crown of Cal. 8X series (Chronograph) is not screw-lock type.
Set time zone manually:
In places where the time zone cannot be adjusted, the time zone can be set manually using the crown.
Set DST(Daylight Saveing Time):
DST(Daylight Saving Time) can be manually set using the crown; DST is not automatically changed.
Adjust the preliminary position of the stopwatch hands, date, indicator hand, and hour/minute hands.
What should I do when I want to use the watch without the light detection?
The light detection is turned on by default but it can be cancelled. While the light detection is disabled, the automatic time adjustment setting is altered to the fixed time reception setting. In such a case, the watch stores time of the previously successful manual time adjustment, and automatically starts time adjustment at the same time.
- How to turn light detection "ON" or "OFF":
-
- 1. Press Button A (at 8 o'clock position) and Button B (at 10 o'clock position) simultaneously for three seconds.
- The preliminary position of the indicator hand is "low".
- 2. Press Button B (at 10 o'clock position) for three seconds. The light detection is set to "ON" if the small second hand points to "Y" (at 52-second position) or "OFF" if the small second hand points to "N" (at 38-second position).
- 3. Press Button A (at 8 o'clock position). The watch returns to the time display mode.
Other Questions
Troubleshooting
How do I check whether the last GPS signal reception was successful or not?
GPS signal reception includes three types;
Time adjustment, Time zone adjustment and Leap second data reception.
The type of reception and reception result (success or failure) of the last GPS signal reception is displayed for 5 seconds.
- 1. Press Button B (at 10 o'clock position) once and then release it. The small second hand and indicator hand display the reception result for 5 seconds.
- 2. Check the position of hands.
The second hand at "Y 52-second position" and indicator hand at "1" → Time adjustment was successful.
The second hand at "Y 52-second position" and indicator hand at "4+" → Time zone adjustment was successful.
The second hand at "N 38-second position" → Reception was unsuccessful.
When the reception has failed in any way, please set the time and date manually.
How do I check whether the leap second data reception was successful or not?
The reception result (success or failure) of the regular leap second data reception is displayed for 5 seconds.
- 1. Press Button B (at 10 o'clock position) once and then release it. The small second hand and indicator hand display the GPS signal reception (time adjustment or time zone adjustment) result for 5 seconds.
The indicator hand points to "1" (time adjustment) or "4+" (time zone adjustment). - 2. Press Button B (at 10 o'clock position) once and then release it while the result of the reception is displayed for 5 seconds in step 1.
- 3. Check the position of hands.
The small second hand at "Y 52-second position" and indicator hand at "0" → The leap second data reception was successful. Use the watch as it is.
The small second hand at "N 38-second position" and indicator hand at "0" → Reception was unsuccessful. It will be performed automatically with the next GPS signal reception (automatic time adjustment/manual time adjustment). Use the watch as it is. - 4. After 5 seconds have elapsed, or when Button A is pressed, the watch returns to the time display mode.
Even when the leap second data reception has not been successful, the time is correct until the leapsecond data is added (or deleted).
What should I do when the watch does not display the correct time?
- Please check the following points:
-
- 1. The last GPS signal reception result:
The time adjustment/ time zone adjustment may not have been successful. If reception was unsuccessful, please move to a place where it is easy to get a GPS signal reception. - 2. The Daylight Saving Time (DST) setting:
The DST setting may not correspond to the current implementation status of DST. - 3. In-flight mode setting:
If the in-flight mode is set, please reset it and perform the manual time adjustment function. - 4. The charging status:
If the charging status is displayed as "low," the reception will not start even with operation of GPS signal reception. Keep in mind to charge the watch regularly. - 5. Stopwatch is in operation:
The watch cannot receive GPS signals when the stopwatch is moving or has not been reset.
- 1. The last GPS signal reception result:
What should I do when the watch does not adjust the time zone setting?
The time zone where you are located can be adjusted to the precise current time with the operation of just one button, anywhere in the world. The watch does not automatically display the local time just by being moved there.
If you are in a place where GPS signals can be easily received, adjust the time zone. The watch automatically displays the local time.
If you are in a place where GPS signals cannot be received, set the time zone manually.
Please check the following points:
- 1. The last GPS signal reception result:
The time adjustment/ time zone adjustment may not have been successful. If reception was unsuccessful, please move to a place where it is easy to get a GPS signal reception or set the time zone manually. - 2. In-flight mode setting:
If the in-flight mode is set, please reset it and perform the manual time adjustment function. - 3. The charging status:
The watch cannot receive GPS signals when the charging status is at "low." Please recharge the watch until the indicator hand points to "full" or in between "full" and "low". - 4. Stopwatch is in operation:
The watch cannot receive GPS signals when the stopwatch is moving or has not been reset.
What should I do when the watch is unable to display the precise time or date even though the result of the last GPS signal reception was successful?
The preliminary position may be misaligned due to a strong impact or magnetism. For detailed procedures, please refer to How do I adjust the preliminary position of the date, indicator hand, and hour/minute hands?
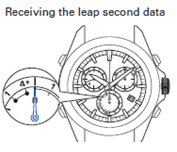
What is happening when the indicator hand is pointing to "0"(zero) ?
The automatic leap second reception function has been activated.
The indicator hand points to "0"(zero) when GPS signal reception is performed (time zone adjustment or time adjustment) around June or December. It takes up to 18 minutes to receive the leap second data.
When the leap second data reception is completed, the indicator hand returns to display the charging status. Use the watch as it is.
When GPS signals are received under the following conditions, the leap second data reception is also started.
• GPS signals have not been received for a long time
• Leap second data reception has failed
Leap second data reception is performed again during the next GPS signal reception. It is repeated until the leap second data reception is successful. Even when the leap second data reception has not been successful, the time is correct until the leap second data is added (deleted).
Receiving Leap Second Data on Seiko Astron GPS Solar Watch
What should I do when the indicator hand is misaligned?
The preliminary position of the indicator hand may be misaligned. This occurs when the preliminary position of the indicator hand is misaligned due to external factors or system reset. Please adjust the premilinary position of the indicator to the correct position "low".
How do I adjust the preliminary position of the date, indicator hand, and hour/minute hands?
What should I do when the hands are not moving even after recharging?
The preliminary position of the indicator hand may be misaligned and displaying charging status other than "low" even though the charging status is actually low. Please adjust the premilinary position of the indicator to the correct position "low" and check the charging status again. If the indicator hand displays "low", recharge the watch.
How do I adjust the preliminary position of the date, indicator hand, and hour/minute hands?
Other Questions
For further detailed information, please refer to the "Basic operations" or "Troubleshooting" sections on the Complete User Guide for GPS Solar watch.
- ASTRON instruction manual
If you cannot find an answer to your question in the instruction manual, please contact the Authorized Seiko Service Center.